How to livestream your worship services
Welcome to our first official "how to" blog post! While Church Social does not offer livestreaming services, it is certainly something we're asked about a lot. To date we haven't been able to help churches all that much as we simply didn't know enough about the process. Well, that changed over the Christmas break!
In my local congregation, the Vineyard Canadian Reformed Church of Lincoln, I am a member of our sound committee. Along with my brother-in-law, Neil DeVries, we set out to get livestreaming working during the break. The following guide outlines exactly how we did this. It is our hope that this will make this process much easier for other congregations looking to do the same.
Table of contents
- Goals
- Cameras
- Capture devices
- Cables
- Audio
- Computer system
- Internet connection
- Broadcasting software
- Livestreaming services
- Sermon archiving
- Complete equipment list
- Conclusion
Goals
As with any project, it's good to start with a list of goals and objectives. These were ours:
- Broadcast the worship services live on the Internet to an unlimited number of viewers.
- Have excellent sound quality and good video quality.
- Have a minimum of two camera angles: a minister view and a congregation view.
- Record a local high-resolution version for archiving purposes.
- Must be easy to manage week-to-week, even by non technically inclined committee members.
- Keep equipment costs below $4000.
Cameras
Choosing a camera was easily the most difficult part of the whole process. There are literally thousands of options. Without being an audio-video expert, it's extremely difficult to know which camera will work best. Do you go with a standard USB webcam? Or maybe the fancier PTZ (pan-tilt-zoom) cameras? What about a standard HDMI camcorder? Or would a DSL camera with video features potentially work? Then there are all the IP-based cameras typically used in security systems. And of course the high-end professional-grade cameras. It's all quite overwhelming.
We initially thought a USB PTZ (pan-tilt-zoom) camera was the right choice. Installation is extremely simple, just plug the camera into an available USB port. Most PTZ cameras allow you to program preset camera locations. This was perfect, since it gave us our two different camera views. We ordered the Logitech PTZ Pro Camera and gave it a try. Much to our disappointment the pan, tilting and zooming was very distracting. It was slow, jerky, and took time to refocus. This just wasn't going to work, especially given how often we wanted to switch between these two views.
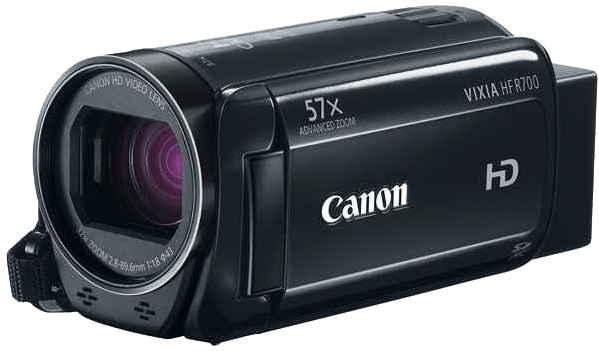
That's when we stumbled onto a very helpful article by Ustream. They recommended HDMI cameras as an upgrade from USB cameras. In particular they recommended the Canon Vixia line. HDMI camcorders are quite inexpensive, provide excellent video quality and high-optical zoom. Since our cameras would be positioned near the back of our church, we needed to be able to zoom quite far for a good view of the minister. In the end we chose two Canon Vixia HF R700s. They cost only $250 each, and provided full HD video (1920x1080) as well as 32x optical zoom.
To mount the cameras we purchased two camera mount arms from Princess Auto. Then to actually attach these cameras to the computer we used 15' HDMI extension cables along with the HDMI cables that came with the cameras. We left the batteries memory cards off the cameras, since they were not needed. We powered the cameras using the power cables that came with them. We had to make a few setting adjustments on the cameras, including turning off display information in HDMI mode, as well as remembering the zoom position when turning the camera back on, since by default the zoom is reset.
Capture devices
Unlike USB cameras that simply plugin to the computer, HDMI cameras require capture devices to make the video signal available on your computer system. We initially purchased a Macbook laptop, so we had to choose an external device for this. At first we thought that the Blackmagic Intensity was the perfect solution here. However, it's very important to note that most new HDMI cameras output in 1080p60. The Blackmagic Intensity wouldn't work since it only supports 1080p30. If you do choose an external capture device like this, make certain that it supports the output signal of the camera you choose, otherwise it will simply not work.
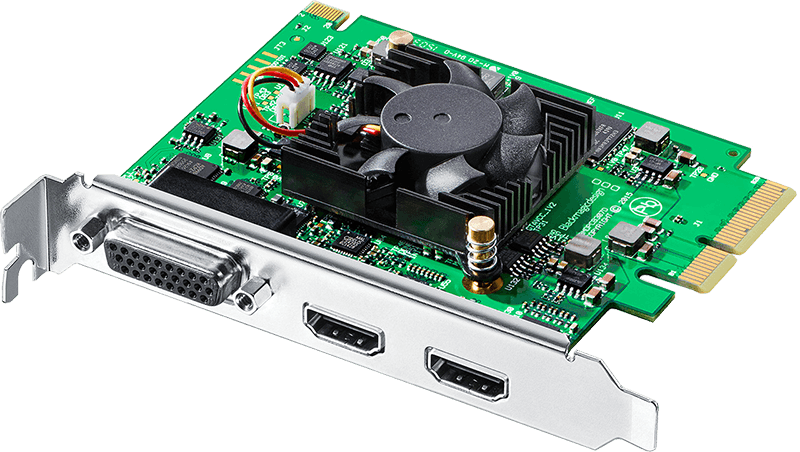
Blackmagic provides another product that does support the 1080p60 output resolution. It's called the Intensity Pro 4K. This is an internal card that must be installed within your computer. Since we had two cameras, we purchased two of these cards. This also meant that we could no longer use our Macbook laptop. We decided to go with a more powerful Windows based computer. Note that your computer must have two available PCIe slots available for this. More on that later.
Cables
Cables can be easily overlooked, but it's important to be aware of their limitations. Both USB and HDMI cables are restricted to about 20 feet in length. Anything longer than that and they may not work. In our church this wasn't an issue since our cameras are within 20 feet of our sound booth. However, if you need to go farther than this with an HDMI camera, consider using SDI cables instead. You'll need an HDMI to SDI converter as well as a capture card that supports SDI, such as the Blackmagic DeckLink.
Audio

For audio you'll likely want to connect into your existing analog sound system. In our situation we used an available output on our sound mixer for this. Since this is an analog audio feed it must be converted to digital to be used on your computer. You may be able to use an existing microphone input on your computer for this. However, in our situation we opted to use a Behringer U-Control UCA222 instead. This is a USB audio capture device that you plug your analog audio feed into. It then becomes available on your computer as a digital audio input.
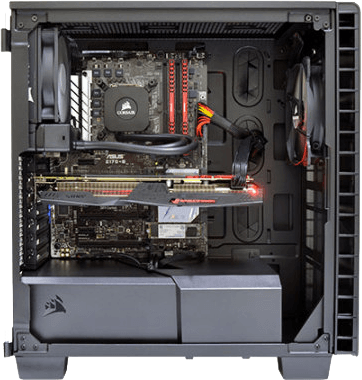
Computer system
As already mentioned, we initially purchased an Apple Macbook for our recording and broadcasting purposes. While these are excellent laptops, you'll need something more powerful when processing multiple video feeds. Put simply: you want a really fast computer for this. The last thing you want is dropped frames or audio/video synchronization issues. With the right system you can also take advantage of hardware accelerated encoding. Here are some recommended minimum system requirements:
- CPU: A late generation Intel i7 processor. We chose the Intel Core i7-6700K Quad-core CPU.
- Memory: No less than 8GB of ram. We went with 16GB.
- Video Card: NVIDIA GeForce (with Kepler architecture or newer). We chose the Nvidia GTX 1070 8GB.
- Hard Drive: A solid-state drive (SSD). We chose a 480GB M.2 SSD drive.
If you choose to use the Intensity Pro 4K capture cards you'll need a system with open PCIe slots. Since we have two cameras we needed two of these cards, which also meant two free PCIe slots. Do note that these must be 4, 8 or 16 lane slots. 1 lane slots will not work. Be sure to confirm that these slots are actually available when buying the computer. The first system we purchased advertised two open slots, but one of the slots was actually covered by a large video card in the system.
Internet connection
You will want to pay special attention to the upload speeds of your internet connection. Since your actual upload speeds may be different than what your internet provider advertises, be sure to run a speed test at www.speedtest.net. For lowest quality (240p) streaming an upload rate of at least 0.65 Mbps is required. 720p streaming requires an upload rate of at least 2.5 Mbps, and 1080p streaming requires at least 4.5 Mbps. That said, we're currently streaming at 720p over a wireless internet connection that tests at roughly 9 Mbps.
Since you may be limited by your internet connection, we recommend also recording a local high-resolution version for archiving purposes. This allows you to lower your livestream resolution, if needed, without sacrificing the quality of your sermon archive. Do note that this increases the load on your computer system, which is another reason why it's important to have a fast computer.
Broadcasting software
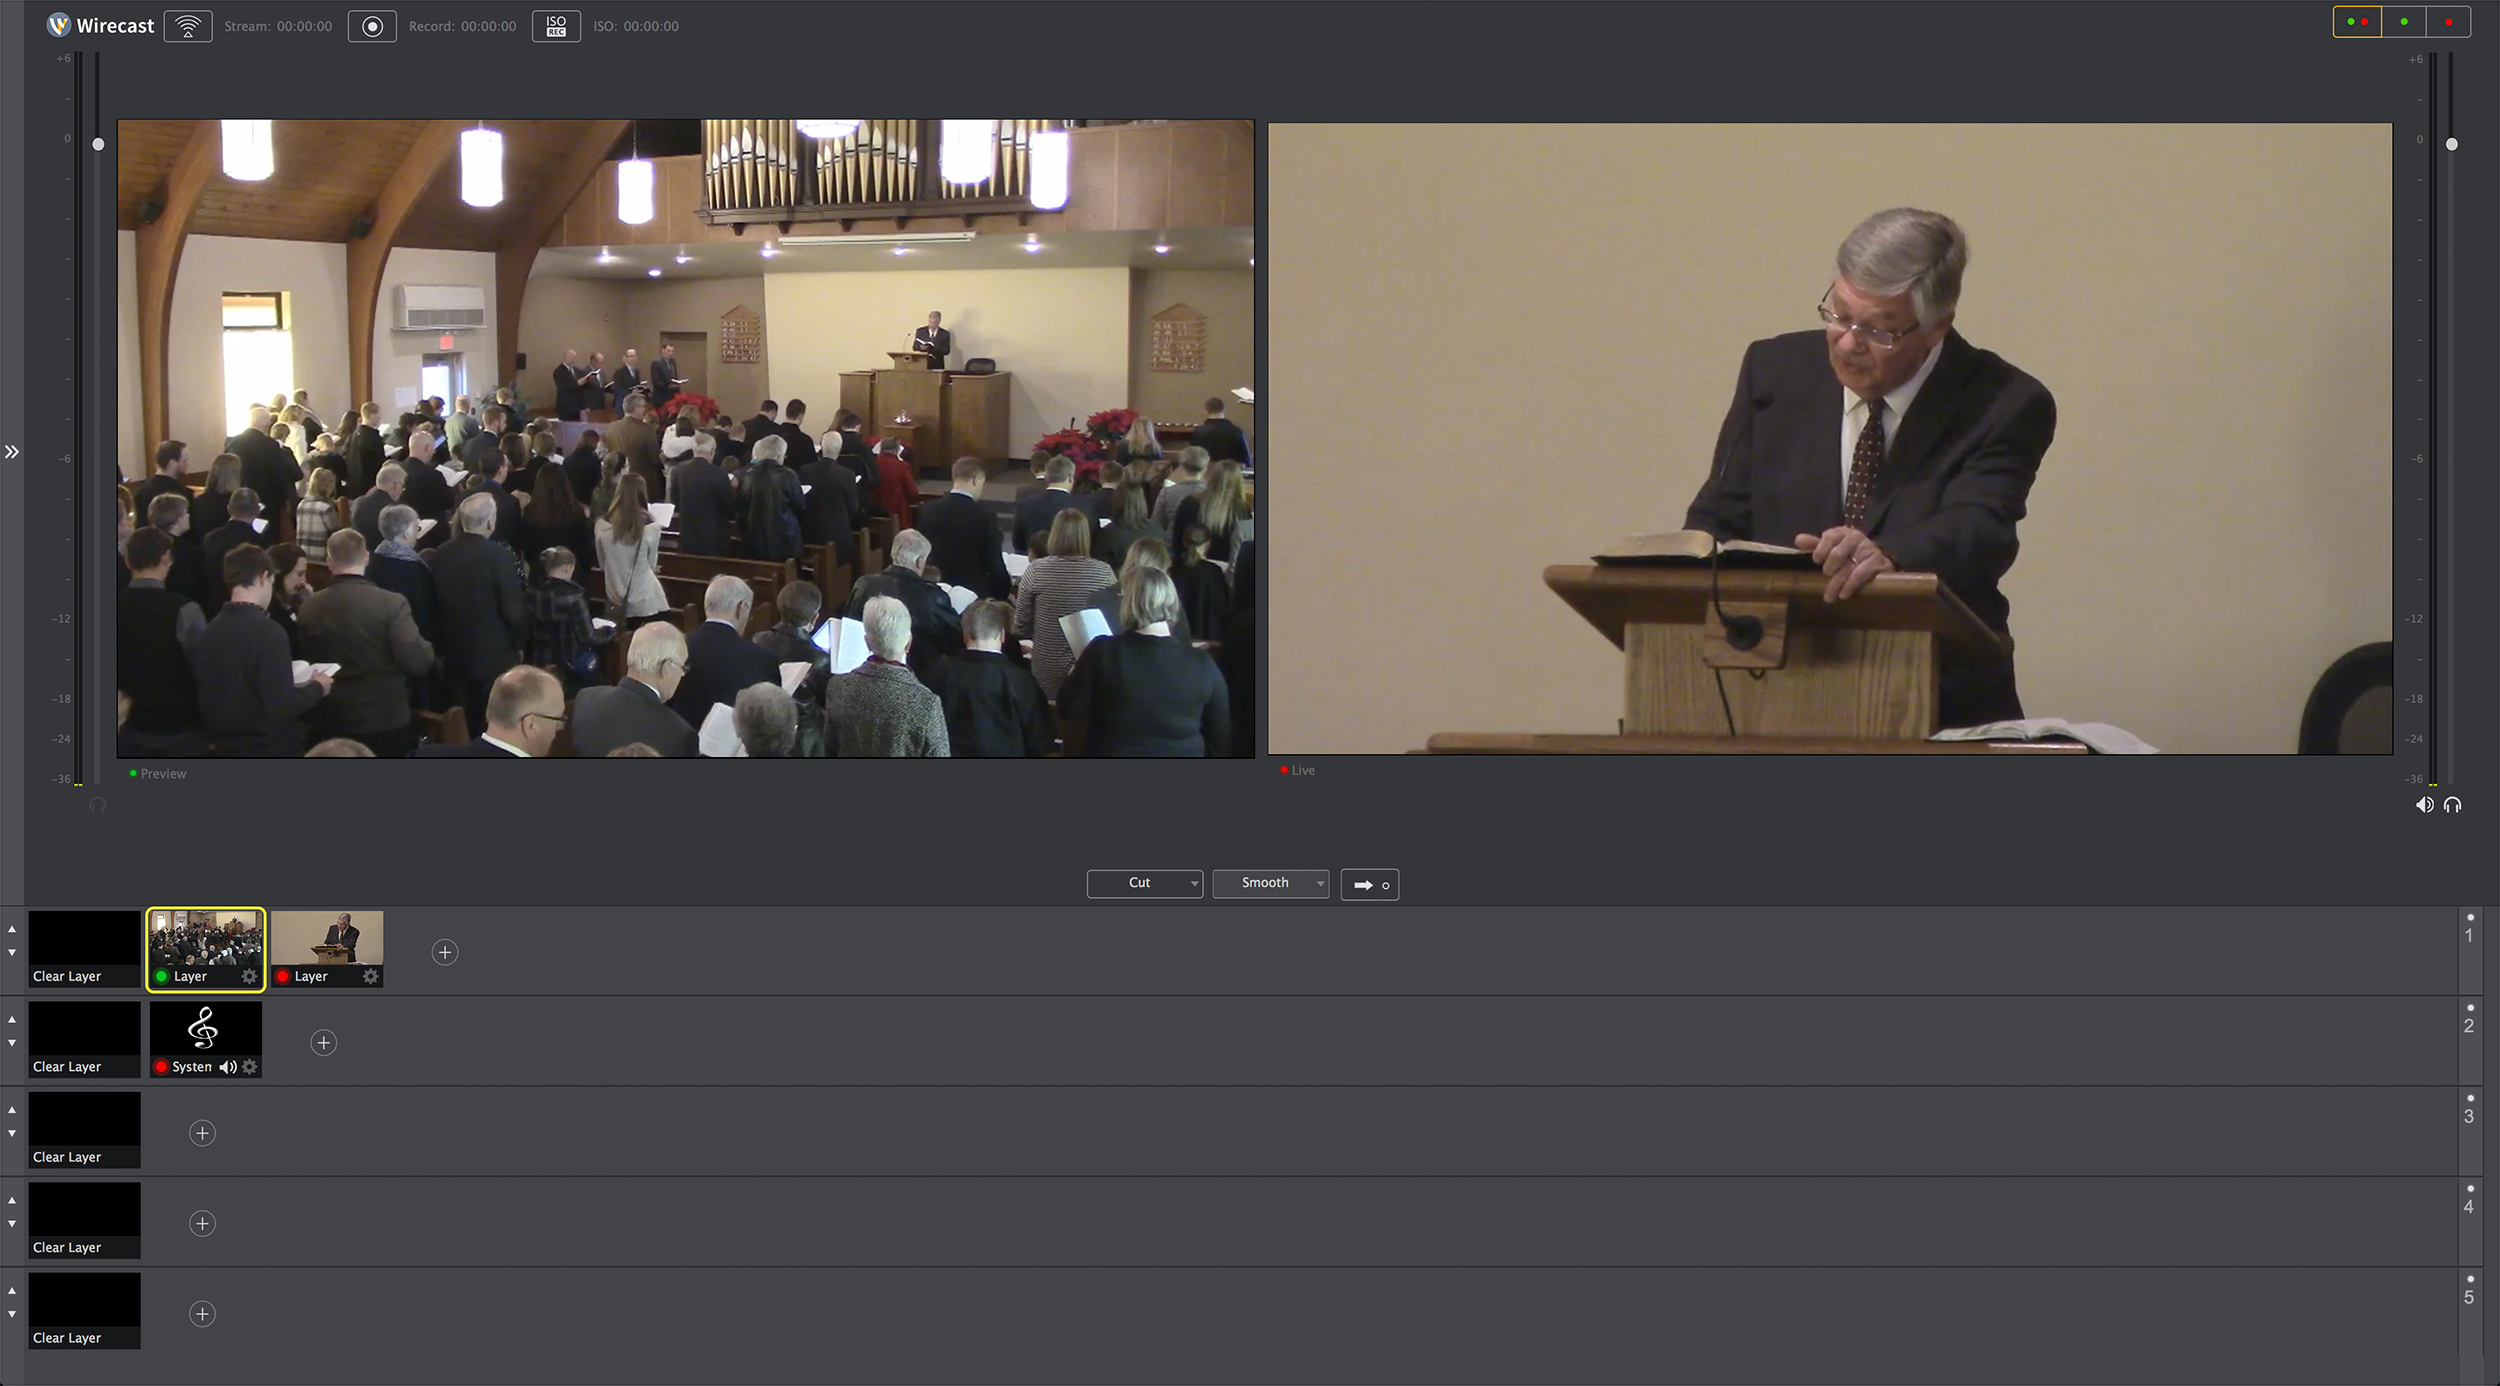
After all the hardware is in place you'll then need to choose what software you'll actually do the broadcasting with. Pay close attention to which software works with which livestreaming services. For example, we chose Telestream Wirecast Studio 7 since it works well with YouTube. However, it does not work with Livestream.com. If you want to use Livestream.com you're probably better off using their Livestream Producer software. We felt that Wirecast was a better choice since it offered integration with many different livestreaming services. This gives us some flexibility to change streaming services in the future without learning completely new software.
Wirecast also makes it possible to stream and record at the same time, which you may recall was one of our goals. You can even choose to stream and record at different resolutions. This is quite helpful if you're on a weaker internet connection. And of course, Wirecast makes it extremely easily to pull in multiple video and audio sources and switch between them during the worship services.
Livestreaming services
We chose YouTube as our livestreaming service largely because it's free and has excellent Wirecast integration. You'll have to create a channel for your church on YouTube. We setup what's called a Google "brand account" for this, since these accounts can have multiple managers and are not tied to one specific committee member's account. Learn more about brand accounts here.
One thing that's a little annoying to get working with YouTube livestreaming is embedding. Embedding allows you to display your livestream on your own website, or within Church Social, instead of viewing it directly on YouTube. Unfortunately, embedding for livestreams on YouTube is disabled by default. To enable embedding you must setup monetisation. This requires creating an AdSense account and then waiting for Google to approve it. This took about a day for us. After monetisation was enabled and approved we were then able to embed. In fact, we immediately disabled monetisation and embedding continued to work. One other thing Google doesn't make obvious is how to embed the entire channel, not just a specific live event. To do this use the following code:
<iframe src="https://www.youtube.com/embed/live_stream?autoplay=1&channel=CHANNEL_ID" width="480" height="400"></iframe>
You can find your channel id in your YouTube account settings.
Sermon archiving
After each live broadcast the video is automatically archived on YouTube. You can absolutely choose to use this as your sermon archive. You can even use embedding to add these videos to your main Church Social sermon archive. We opted not to do this for a couple reasons. First, the livestreamed video is lower resolution than our locally recorded version. Also, since we start the livestream quite early (up to 20 minutes before the service actually starts), there is a lot of "useless" video that doesn't make sense to keep in our sermon archive. In fact, we've chosen to only include the scripture reading and actual sermon in our archive, not the full service.
We host our high-resolution videos on Vimeo and then use embedding to save these videos in our Church Social sermon archive. Here is an example of a recent recording:
Complete equipment list
Here is a complete list of all the hardware we purchased for our livestreaming setup along with the approximate costs. As you can see we managed to stay within our $4000 budget.
- Computer system with Microsoft Windows 10 ($1800)
- 22" computer monitor ($100)
- Logitech Wireless Touch Keyboard K400 Plus ($25)
- Blackmagic Intensity Pro 4K ($245 x2)
- Behringer U-Control UCA222 ($30)
- Canon Vixia HF R700 ($250 x2)
- Telestream Wirecast Studio 7 ($600)
- Camera Mount Arm ($25 x2)
- 15' HDMI extension (male to female) cable ($15 x2)
- Total: $3,625 (before tax)
Conclusion
As mentioned at the start of this article, we only just recently got this up and running in our church. However, we're already very pleased with the results. I'll be sure to update the article if we run into any issues or learn any other useful tips to share. If you have any questions about this article, please feel free to email us!